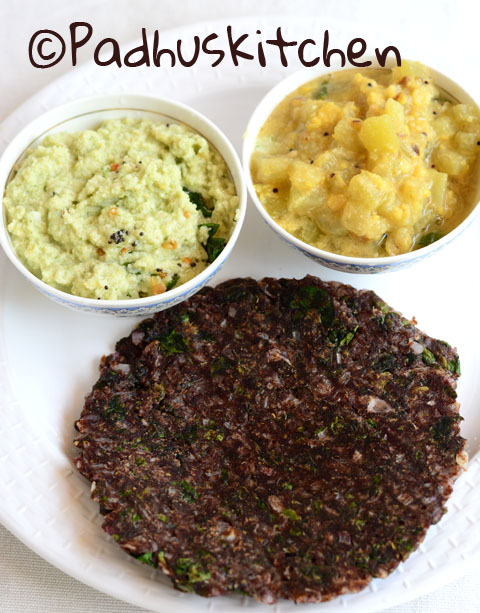
This finger millet (known as kelvaragu/keppai in Tamil) drumstick leaves adai tastes just heavenly. Even ragi-haters will like it very much. I love this keerai ragi adai so much that I make it once in a week. I have already posted ragi vegetable adai but this adai tastes totally different from that. Try it and you will know. Today we will learn how to make murungai keerai ragi adai following this easy recipe with step wise pictures.
Murungai Keerai Ragi Adai
Prep Time : 5 mins
Cook Time : 20 mins
Yields: 3
Recipe Category: Breakfast
Recipe Cuisine: South Indian
Author:Padhu Sankar
Yields: 3
Recipe Category: Breakfast
Recipe Cuisine: South Indian
Author:Padhu Sankar
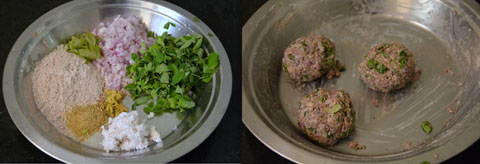
Ingredients needed
Ragi flour – 1/2 cup
Shallots/pearl onions – 1/2 cup very finely chopped
Ginger – 1 inch piece
Green Chilli -1
Grated coconut – 3 tbsp
Fennel powder /sombu powder -1/2 tsp
Tender curry leaves – a sprig
Tender drumstick leaves – fistful
Salt to taste
Preparation
Grind ginger and green chilli just for a second.
Method
In a plate, add ragi flour, salt needed, curry leaves, very finely chopped onions, chopped drumstick leaves, grated fresh coconut, ginger + green chilli paste and fennel powder.
Add warm water and make a soft dough.
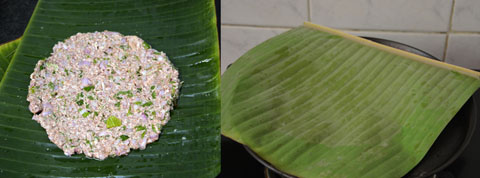
Grease a few drops of oil on a banana leaf. Place a ragi dough ball and spread it evenly with your fingers.
Heat a tawa, invert the banana leaf on the tawa with the adai. Then slowly lift the leaf alone leaving the adai as in the picture below. Those who cannot get banana leaf can check other options in the notes section below.
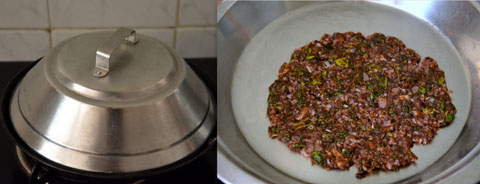
Drizzle a tsp of oil around the adai and little on top of the adai and cook covered on medium low heat. By covering the adai will be soft and delicious.
Once cooked, flip it over to the other side and cook uncovered. The color of the adai will change once it is cooked. (you need patience as it will take time to cook and you must cook it only on medium low heat).
Once cooked, remove from tawa and serve hot with any chutney of your choice.
Repeat the same process for the rest of the dough.
Notes -Use only shallots for best results. This adai tastes heavenly because of the shallots and fennel powder, so do not omit it.
This adai can be done without drumstick leaves also.
For those who cannot get banana leaf, can use a damp cotton cloth/handkerchief (kept separately for this purpose).
You can also use ziplock cover or oil cover. In that case you cannot keep it directly on the heated tawa. Transfer it to your hands and then place it on the hot tawa. The disadvantage in this method is you cannot spread thinly.
You can also spread it directly on the tawa before heating it. You can have 2 tawas or wait for the tawa to cool down before spreading the next one.
Check out my
South Indian style Adai dosa recipe (with drumstick leaves-rich in iron and protein)
Drumstick leaves curry with cabbage
Check out more Ragi Recipes
If you found this post useful, I would really love it, if you pin it or share it with your Facebook fans or Twitter followers or Google+ circles today. All it takes is a simple click on the “pin it” “like,” “share,” “tweet,” or Google+ buttons below the post. It will keep me motivated. Thank you!
View Comments (5)
Ur adai looks yummy and colorful....but when I tried it was too dark (before cooking) also the adai breaks on turning it and cracks in the edges too... Pls clarify...
You have to spread it with your fingers. It should not be too thick nor too thin. If it is too thin, then it will break. If the dough is dry also it will break. While spreading, you have adjust the edges with the other hand, so the shape will be even without cracks. I have given clear pictures for better understanding. (see third picture where the dough is spread evenly and neatly without any cracks)
Wow super dish my husband like the dish
Hi, can I use whole ragi for this instead of flour? If yes, how much water do I need to grind it?
We use only ragi flour for adai. Only for dosa we grind whole ragi.