

Thenkuzhal is a tasty and crispy snack make from rice and urad dal flour. In this post I am sharing with you Thenkuzhal murukku made with home made murukku mavu/flour and also how to make murukku flour at home.
- 4 cups Raw Rice
- 1 cup Urad dal (whole skinned urad dal)
- Murukku flour
- 7 tbsp Butter
- 2 tsp White sesame seeds or cumin seeds
- 1/2 tsp Asafoetida/hing (flat)
- Salt needed
- Oil for deep frying
-
Wash and soak raw rice for 2 hours.
-
Drain the water, spread it on a cloth and dry it completely in the shade.
-
Fry urad dal slightly until hot to touch.
-
Once the rice dries well, mix urad dal with it and get it ground to a fine powder in a flour mill or rice mill.
-
Sieve it and keep it ready.
-
Our Homemade murukku flour or thenkuzhal murukku mavu is ready.
-
We are going to use all the murukku mavu.
-
Mix salt and asafoetida/hing in a little water and keep it ready.
-
In a wide plate or bowl, add murukku flour, cumin seeds, butter and mix it well with your finger tips.
-
Then add the salt + hing water and mix it well. (do not add the sediments in the salt + hing water)
-
Add water little by little and prepare a soft firm dough.
-
Knead well. The dough should not be too hard nor too soft. Taste the dough to check for salt. If needed mix it with little water and add. Knead again.
-
Grease the murukku maker with oil. Use the disc with 3 round holes.
-
Put a small portion of dough into the murukku maker and squeeze it out in a circular motion on a greased ladle or greased small plate.
-
Heat oil in a kadai for deep frying.
-
To check if the oil is hot, just drop a small piece of murukku dough into the oil, if it raises to the surface immediately, it is an indication that the oil is hot enough to fry the murukkus.
-
Reduce the heat to medium.
-
Gently slide 3-4 squeezed out murukkus into the oil. You can also squeeze the murukku directly into the oil, if you have experience.
-
Do not disturb for the first few seconds. Then flip it over and fry the murukkus both sides until golden brown. You will hear a sizzling sound which indicates the murukku is getting cooked.
-
Once the bubbling or the sizzling sound stops, the murukku is done.
-
Remove it with a slotted ladle and drain on a paper towel or colander.
-
Repeat the process for the rest of the dough.
-
After it cools, store it in an air tight container. It has a self life of 10-15 days.
Recipe Video
Note-
Those who are trying it for the first time can half the ingredients and use only half of the total murukku mavu.
You can use either butter or oil for preparing the dough. If using oil, heat the oil and add the the murukku flour. The measurement for the oil is the same as butter.
For murukku with sesame seed flavor, add sesame seeds and for cumin seed/jeera flavor, add cumin seeds. Do not add both together.
Preparation
How to make murukku flour at home
Wash and soak raw rice for 2 hours, dry it well in the sun or shade.
Fry urad dal slightly until hot to touch.
Once the rice dries well, mix both rice and urad dal and get it ground to a fine powder in a flour mill or rice mill.
Method
How to make murukku
We are going to use all the murukku flour, we got it ground in the flour mill.
Mix salt and asafoedita/hing in a little water and keep it ready.
In a wide plate or bowl, add murukku flour, cumin seeds, butter and mix it well with your finger tips first.

Add water little at a time and prepare a soft firm dough. Knead well. The dough should not be too hard nor too soft.
Grease the murukku maker with oil. Use the disc with 3 round holes.

Making of Murukku
Heat enough oil in a kadai. To check if the oil is hot, just drop a small piece of murukku dough into the oil, if it raises to the surface immediately, it is an indication that the oil is hot enough to fry the murukkus.
Reduce the heat to medium.
Gently slide 3-4 squeezed out murukkus (depending on the quantity of oil) into the oil.
Do not disturb for the first few seconds. Then flip it over. Fry both sides until it turns golden brown.
You will get a sizzling or bubbling sound, which indicates the murukku is getting cooked.
Once the bubbling sound stops, it indicates that the murukku is done. (compare pic 3 and 4 above).
Remove it with a slotted ladle and drain on a paper towel or colander.
Repeat the same process for the rest of the dough.
Enjoy preparing this Thenkuzhal Murukku for this Diwali
Note-
Those who are trying it for the first time, can half the ingredients mentioned above including the ground murukku mavu. Take only half the quantity of the total ground murukku mavu and half the ingredients also.
You can use either butter or oil for preparing the dough. If using oil, heat it and add to the murukku flour. The measurement is the same as butter.
i love these ones.. good demo..
lovely Murukkus.. My all time favorite..
beautifully explained post padhu. perfectly made crispy murukkus.
Nice and crunchy tea time snack..I can't ever stopping munching these whenever I make them.
looks great my hubbys favorite Indian snack but man can you end up eating a lot of it he he
Crispy and yummy,love this anytime..
Feel like munching some,yummy!
A crispy and lovely snack….
Lovely snack..
My favorite snack…Thanks
Love thenkuzhal…they look perfect..
yum…love this..
Dear padhu
How are you? I am off blog these days and cant visit often. I like murku but cant make it. I can't try the ones available in the market because i am not sure if I will be able to break the murku or murku will break my teeth ( whatever is left ). I take note of adding the right quantity of oil in the mix.
Let me see what all I have missed here .
Have a nice day
Delicious thenkuzhal..
Mmm … looks really good! Thanks Padhu for sharing the recipe! Bookmarked it.
BTW, you've said to use whole white ones. I'm little confused as we only get either the whole black lentil or the split ones here. Can I use the split lentil?
Murukku looks crispy, crunchy, yummy and tempting. I can have it anytime.
Please collect your award from my blog.
That looks soo crispy n delicious:-) Cant stop munching!!
Crispy snack, drooling here.
lovely murukkulu !! so crisp and wonderful snack !!
Nice murukku..would love to have one ….
My fav muruku. Lovely and crisp.
I love these murukku but never tried…urs look crispy and thanx for the elaborate info…will try 2 make this..:)
Please collect your award from my blog ….
They look so crispy and nice…loved the detailed description!
Looks crunchy and delsih..Homemade flour always make tastier murukku
lovely muruku..excellent recipe..already following u..do visit my space as time permits..
I love this snack.
good instruction, i shall revert back to ur page when i dare enough to fry, but all i want now is murrukku!
Murukulu looks tempting and crispy snack …..
following u on google followers ……
Steamy! I absolutely love this Padhu.
hey Padhu, your blog posts are excellent.. I tried your tenkuzhal and 7 cup cake yesterday for diwali sweets and they turned out to be really good. I have only heard of okkarai as my maternal grandma is from thirunelveli.. Now I get a chance to try it.. Please do continue posting traditional recipes which are dangerously lost in our generation 🙂
I always make ur recipes and enjoy them Me born and raised in Kerala and now in Thailand
Padhu,you are doing a great job. Whenever I find time I read your recipes.Hats off for posting traditional recipes.
Sagarika
hi
can i grind in mixie??
can i use raw rice flour bought from the shop?
Prepare rice flour as mentioned above. You can try less quantity with store bought flour and see.
Anandhini – you can grind in mixie but will take a long time.
Hi padu, sorry but silly doubt wat if rice is soked for more than 2 hrs…… please let me know.
No problem, if rice is soaked a little more than 2 hours but 2 hours is more than sufficient.
what is the shelf life of the flour that we make? So that we can have it ready and use it when needed
If you dry it properly and the flour is without moisture, it has a shelf life of around 3 months.
Hi Pathu
Which rice variety I have to use for making murukku
You can use any raw rice used for regular cooking.
Ma'am will this thenguzal murukku be in white color or golden as my kid loves only the white ones.
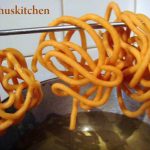
No it will not be white, it will be as shown in the picture (light brown).
Awesome murukku recipe… I prepared as per your recipe and out come was excellent
Padhu my tenguzhal is bursting wat can I do please tell me
If you had used homemade rice flour, it should be dried well in shade. It happened once to my mother when she did murukku with slightly damp rice flour. Secondly, you must mix the salt well.
Hi padhu,Thanks for the recipes, you make our day. Our wishes and prayers. Keep rocking…… Meenakshi Karthikeyan
Hai paddy thank you for thenkulal recipe.it tastes crispy.BinduDhandapani
Hi Ma’am. If i want to use store bought flour, can you pls tell me what to mux and in what proportion?
I have a murukku recipe using store bought rice flour.
https://www.padhuskitchen.com/2015/08/pottukadalai-murukku-rice-flour-chakli.html
I tried this and came out very well. Thank you Mam
Hi, I’m planning to make this for Diwali. Can I make the rice flour with Sona masoori rice?
You can but you have to prepare the rice as it is mentioned.