Phulka also known as roti or chapati is a popular Indian flat bread made with wheat flour. Making phulka or roti is not difficult. All you need is practice. Once you practice and get the hold of it, making phulka on direct flame is a breeze. Though I have posted how to make soft rotis on tawa long time back, today I am going to share with you tips to make soft phulkas on stove top (direct flame method).
How to make Phulka (on gas top)
Yields – 6 rotis/phulkas
Ingredients needed
Whole Wheat flour (without maida) -1 cup
Oil – 1 tsp
Salt – a pinch
Tongs specially sold for making phulkas
Rolling pin and board
Quality of Wheat flour (atta)
Buy good quality wheat flour (atta) without maida. Maida is not good for our health. So do not buy wheat flour with maida. Read the ingredients on the pack before buying. Use any good quality atta. I personally prefer Aashirwad brand. You can use homemade atta also.
Kneading the dough- How to make phulka dough
Kneading the dough well is very important to get soft phulkas. Let us see how to make phulka dough.
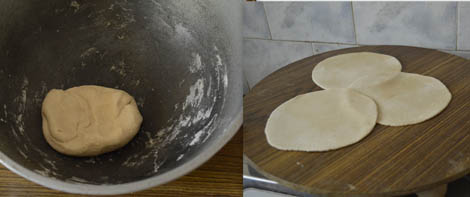
In a bowl, mix together flour, salt and oil using your finger tips. Add lukewarm water little by little and gather the dough with your fingers. Once it comes together, grease your palm with 3-4 drops of oil and knead well. Use your knuckles or heel of your hand for kneading.(If you feel that the dough is sticky, you can add a little more atta and if you feel that the dough is dry and hard, you can add little water)
Once you finish kneading, the dough will not stick to your hands.The dough should be soft and pliable with a smooth texture. Leave it covered for 15-20 minutes.
You need approximately little less or a little more than 1/2 cup of water for 1 cup of flour depending upon the quality and brand of wheat flour used.
Rolling out the dough
Rolling out the dough is equally important as kneading.
Divide the dough into equal sized smooth balls. Keep some wheat flour or rice flour for dusting. Take a dough ball, flatten it with your finger tips, dust flour and using a rolling pin, roll out the dough to form a circle of 2 mm-3 mm thickness. It should not be thicker on one side and thinner on the other side. It should be uniform on all the sides. There should be no holes or puncture in the rolled out dough. The roti will not puff up, if there is a hole.(have a look at the picture of the rolled out dough below)
As far as possible try to use minimum flour for dusting. Beginners might need more flour for rolling out the dough but once you practice, you can overcome that. The rotis will become dry, if you use too much flour for dusting.
Cooking the phulkas on gas stove
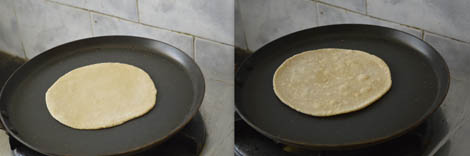
Heat a tava or skillet on medium high heat, once heated, put the rolled out dough on it. Cook for few seconds, until small bubbles start to appear. You do not have to cook the first side for more than few seconds as we will be putting it on direct flame.
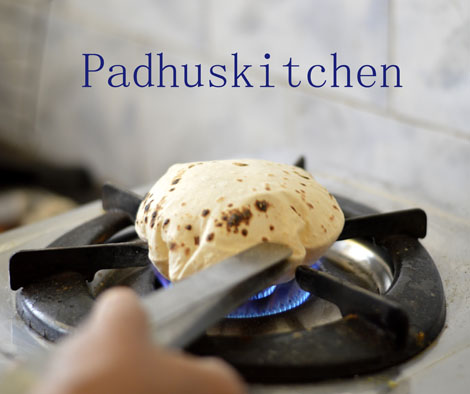
Flip it over to the other side and cook the other side for a little longer time than the first side and then transfer it to direct high flame with the first side down. (hope I have made it clear)
The roti will puff up like a balloon.(see first picture) Once it puffs, remove it from flame immediately using the tongs or else it will get burnt.
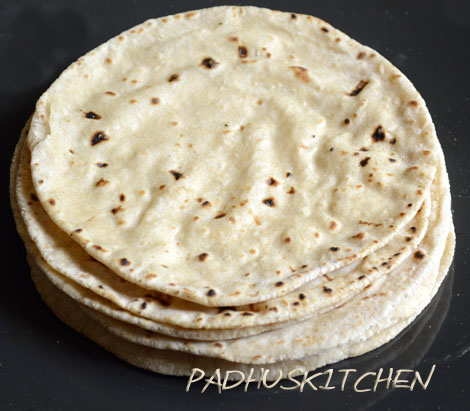
Apply a little melted ghee and keep it wrapped in a soft cloth in a bowl with lid. This will prevent the roti from drying or becoming soggy.
Repeat the same process for the rest of the dough. Beginners can roll out 3-4 rotis and keep it ready before heating the tava.
Note – Do not loose heart if your rotis do not puff up, they still taste great. Keep practicing and you will succeed.
If you do not have a gas stove, you can make phulka puff up on electric stove also with the help of a tava. I used to make rotis as shown below in my earlier days of marriage. The rotis prepared as shown below also tastes delicious. Check it below-
If you found this post useful, I would really love it if you pin it or share it with your Facebook fans or Twitter followers or Google+ circles today. All it takes is a simple click on the “pin it” “like,” “share,” “tweet,” or Google+ buttons below the post. It will keep me motivated. Thank you!
View Comments (33)
excellent photos :)
neatly done .
Wonderful post for beginners ...
Great presentation, with very good useful tips.i searched every where for making good pulkas, but you have given useful tips from the scratch.thank you very much.
Lovely click Padhu! I have tried many times to capture such a shot but failed. Nice post
Very soft and tempting phulkas. Must have melted in mouth once taken in.
Deepa
Very well written Paddu! Love the pics too!
Very clear and detailed post for beginners, am sure none will go wrong after seeing ur post.
such a useful tutorial padhu..nice post
"Tongs specially sold for making phulkas" where do you get it? I am in chennai,India. how does it look?