• Skip to primary navigation
  • Skip to main content
  • Skip to primary sidebar

Padhuskitchen


  • HOME
  • ABOUT
  • RECIPE INDEX
  • VIDEOS
  • USEFUL TIPS
  • TESTIMONIALS
  • FESTIVAL RECIPES
    • Avani Avittam
    • Pongal Festival
    • Vinayaka Chaturthi
    • Thiruvathirai
    • Navratri Recipes-Navratri Sundal Recipes
    • Varalakshmi Vratham
    • Karadaiyan Nombu
    • Tamil New Year
    • Adi Perukku
    • Krishna Jayanthi
    • Diwali
    • Karthigai Deepam
    • Christmas
    • Onam
  • Side Dish For Chapati
  • CONTACT
  • Privacy Policy

Phulka-How to make Soft Phulkas-Roti-Phulka Recipe (Direct flame method)

August 30, 2013 by PadhuSankar 33 Comments

Phulka also known as roti or chapati is a popular Indian flat bread made with wheat flour. Making phulka or roti is not difficult. All you need is practice. Once you practice and get the hold of it, making phulka on direct flame is a breeze. Though I have posted how to make soft rotis on tawa long time back, today I am going to share with you tips to make soft phulkas on stove top (direct flame method).

How to make phulka

How to make Phulka (on gas top)

Yields – 6 rotis/phulkas

Ingredients needed

Whole Wheat flour (without maida) -1 cup
Oil – 1 tsp
Salt – a pinch
Tongs specially sold for making phulkas
Rolling pin and board

Quality of Wheat flour (atta)

Buy good quality wheat flour (atta) without maida. Maida is not good for our health. So do not buy wheat flour with maida. Read the ingredients on the pack before buying. Use any good quality atta. I personally prefer Aashirwad brand. You can use homemade atta also.

Kneading the dough- How to make phulka dough

Kneading the dough well is very important to get soft phulkas. Let us see how to make phulka dough.

In a bowl, mix together flour, salt and oil using your finger tips. Add lukewarm water little by little and gather the dough with your fingers. Once it comes together, grease your palm with 3-4 drops of oil and knead well. Use your knuckles or heel of your hand for kneading.(If you feel that the dough is sticky, you can add a little more atta and if you feel that the dough is dry and hard, you can add little water)

Once you finish kneading, the dough will not stick to your hands.The dough should be soft and pliable with a smooth texture. Leave it covered for 15-20 minutes.

You need approximately little less or a little more than 1/2 cup of water for 1 cup of flour depending upon the quality and brand of wheat flour used.

Rolling out the dough

Rolling out the dough is equally important as kneading.

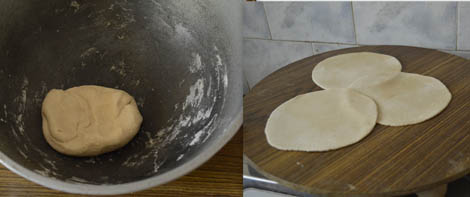
Divide the dough into equal sized smooth balls. Keep some wheat flour or rice flour for dusting. Take a dough ball, flatten it with your finger tips, dust flour and using a rolling pin, roll out the dough to form a circle of 2 mm-3 mm thickness. It should not be thicker on one side and thinner on the other side. It should be uniform on all the sides. There should be no holes or puncture in the rolled out dough. The roti will not puff up, if there is a hole.(have a look at the picture of the rolled out dough below)

phulka dough and rolled out phulkas

As far as possible try to use minimum flour for dusting. Beginners might need more flour for rolling out the dough but once you practice, you can overcome that. The rotis will become dry, if you use too much flour for dusting.

Cooking the phulkas on gas stove

Heat a tava or skillet on medium high heat, once heated, put the rolled out dough on it. Cook for few seconds, until small bubbles start to appear. You do not have to cook the first side for more than few seconds as we will be putting it on direct flame.

how to make chapati

Flip it over to the other side and cook the other side for a little longer time than the first side and then transfer it to direct high flame with the first side down. (hope I have made it clear)

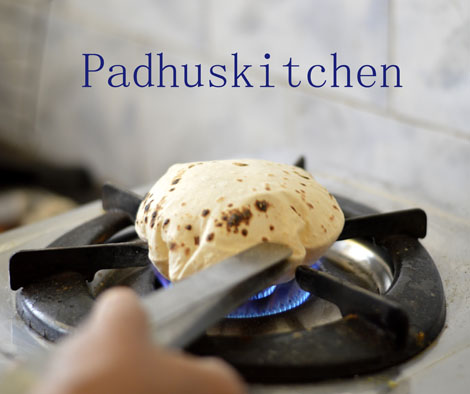
The roti will puff up like a balloon.(see first picture) Once it puffs, remove it from flame immediately using the tongs or else it will get burnt.

Apply a little melted ghee and keep it wrapped in a soft cloth in a bowl with lid. This will prevent the roti from drying or becoming soggy.

Repeat the same process for the rest of the dough. Beginners can roll out 3-4 rotis and keep it ready before heating the tava.

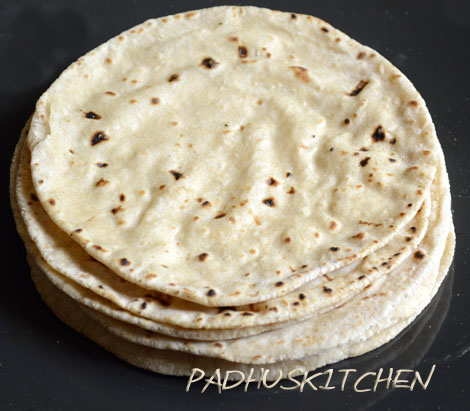
Phulka

Note – Do not loose heart if your rotis do not puff up, they still taste great. Keep practicing and you will succeed.

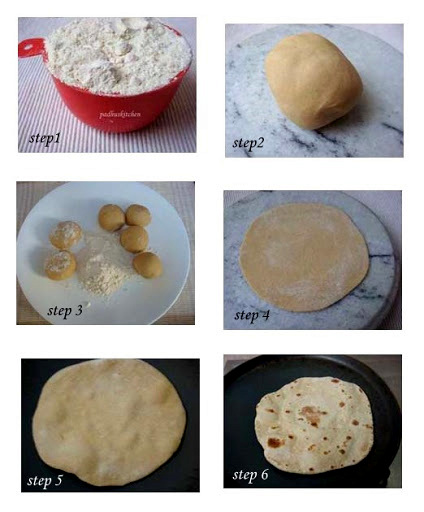
If you do not have a gas stove, you can make phulka puff up on electric stove also with the help of a tava. I used to make rotis as shown below in my earlier days of marriage. The rotis prepared as shown below also tastes delicious.  Check it below-

How to make Rotis on tawa 
roti steps
If you found this post useful, I would really love it if you pin it or share it with your Facebook fans or Twitter followers or Google+ circles today. All it takes is a simple click on the “pin it” “like,” “share,” “tweet,” or Google+ buttons below the post. It will keep me motivated. Thank you!

Related posts:

Aadi 18-Aadi Perukku Recipes-Pathinettam Perukku Recipes

Barley Spinach Khichdi-Barley Recipe-Healthy Lunch Ideas

Oats Dosa Recipe-Instant Oats Dosa

Double Beans Pulao-Double Beans Rice-Healthy Lunch Box Recipes

Filed Under: Breakfast Varieties, How To, Uncategorized Tagged With: Atta/wheat flour, Health Dish, Uncategorized


Previous Post: « Carrot Uttapam Recipe-Uthappam-Fun Food for Kids
Next Post: North Indian Lunch Menu Ideas-Simple North Indian Meals »

Reader Interactions

Comments

  1. AparnaRajeshkumar

    August 30, 2013 at 10:00 am

    excellent photos 🙂

    Reply
  2. சாருஸ்ரீராஜ்

    August 30, 2013 at 11:07 am

    neatly done .

    Reply
  3. Sapana Behl

    August 30, 2013 at 11:14 am

    Wonderful post for beginners …

    Reply
  4. Anonymous

    August 30, 2013 at 3:18 pm

    Great presentation, with very good useful tips.i searched every where for making good pulkas, but you have given useful tips from the scratch.thank you very much.

    Reply
  5. Swasthi Blank

    August 30, 2013 at 3:20 pm

    Lovely click Padhu! I have tried many times to capture such a shot but failed. Nice post

    Reply
  6. Hamaree Rasoi

    August 30, 2013 at 3:37 pm

    Very soft and tempting phulkas. Must have melted in mouth once taken in.
    Deepa

    Reply
  7. Madhavi K

    August 30, 2013 at 3:41 pm

    Very well written Paddu! Love the pics too!

    Reply
  8. Priya Suresh

    August 30, 2013 at 9:15 pm

    Very clear and detailed post for beginners, am sure none will go wrong after seeing ur post.

    Reply
  9. Sireesha Puppala

    August 30, 2013 at 11:38 pm

    such a useful tutorial padhu..nice post

    Reply
  10. R.VENKATARAMAN

    August 31, 2013 at 3:09 am

    "Tongs specially sold for making phulkas" where do you get it? I am in chennai,India. how does it look?

    Reply
  11. PadhuSankar

    August 31, 2013 at 3:58 am

    I got it in Rathna stores- T Nagar. Buy tongs with blunt edges otherwise it will make a hole in the phulka while lifting. You get it in all stores which sell utensils. Ask for tongs used for making chapati.

    Reply
  12. Kripa Vijay

    September 1, 2013 at 3:20 am

    Hello Mrs.Padhu… I am Dr.Kripa from Chennai. I am a regular follower of ur blog and ur recipes come out awesome. Should thank u for sharing your recipes with us…I ve recently started making these phulkas and all at home like them more than chapathis so I make them often.but I do have a doubt about them.when we put them directly on the flame will there be any chemicals emanating from the gas which wouldn't be good for our health?I would really be happy if u could clarify this query for me….Thank you….

    Reply
  13. PadhuSankar

    September 1, 2013 at 6:33 am

    We are going to put it just for a second. If you feel that way, you can buy a wire rack and put it on top of that. This method has been followed for years, so I don't think it is bad for health. You have another option- to puff it on tawa top itself.You can go for that.

    Reply
    • Kripa Vijay

      September 2, 2013 at 8:10 am

      Oh OK.Thank you so much for your prompt reply…

      Reply
    • Sunshinebuster

      October 6, 2015 at 2:33 pm

      Just found this post. Thanks for making it look so easy. Really want to try these!

      Reply
  14. Cbhagya Raj

    September 5, 2013 at 6:50 am

    nice i don't no how to prepare pulka thanks madam

    Reply
  15. Narindra Ervah

    September 11, 2013 at 12:35 pm

    Thank you so much for all the tips and even the great picture to show it, very helpfull post indeed especially for foreigner like me 🙂 . I do have one question though, when i prepare it ,it comes out hard :(. Please do help me.

    Reply
  16. PadhuSankar

    September 11, 2013 at 2:47 pm

    Narindra Ervah – Thanks a lot for liking the post. Glad you found it useful. About your question- The dough must not be hard, it should be soft and pliable. Kneading the dough is very important to get soft phulkas. Quality of the dough is also equally important.

    Reply
  17. Sumanth Nigade

    November 11, 2013 at 1:28 pm

    Madam all your recipe are good.. i tried it has come out well, any thing i need to prepare i check for your recipe first. phulka recipe is also good… 🙂

    Reply
  18. The Beautiful World

    January 1, 2014 at 11:36 am

    I love all your recipes, they are awesome. My family gets to enjoy tasty meals all thanks to you.!!!!! 🙂

    Reply
  19. Rathna hanuman

    March 2, 2014 at 8:19 am

    hi sister! i hope i can cal u so! really ur receipes r fantastics, i started loving kitchen all becoz ur receipe, i was watching ur page for the past one and a half years, but nw only am replying u, expecting more receipes from u,one more kind obligation, if possible post the receipes along with the photos, its easy for freshers like us to compare and go ahead to the next stage-yours lovingly rathna

    Reply
  20. REKHA VIJAYAKUMAR

    January 9, 2015 at 6:28 am

    A very helpful post for all those who love cooking. Thank u .

    Reply
  21. krushna rath

    January 30, 2015 at 4:22 pm

    Good one. But is oil req for roti..
    Oil is only for chapati?

    Reply
  22. Veenu

    April 28, 2015 at 9:04 am

    Thanks Padhu!

    With your simple steps and that too with graphical view I could made Rotis for my Daugther and me. God Bless!

    Reply
  23. Princess

    July 28, 2015 at 7:42 am

    You have a wonderful taste Padhu! All your recipes are very useful and easy for new beginners.. Excellent!!!

    Reply
  24. swed

    November 16, 2015 at 11:57 am

    Great work…Keep it up.. 🙂

    Reply
  25. Vijay Kumar

    January 26, 2016 at 12:43 pm

    This is really helping me. U r my favorite. Thank u:)

    Reply
  26. Sangeetha A

    June 10, 2016 at 1:35 am

    Tried every step. Net result, perfect tawa phulka

    Reply
  27. Swarna Nirmal

    September 17, 2016 at 1:18 pm

    Being alone away from home my little kitchen follows always Padhu's recipes which is easy n perfect for we Tamil people.. I get a lot of help n instructions from your posts..i simply follow your recipes n try out making tasty foods

    Reply
  28. manivannan suruliraj

    October 6, 2016 at 12:38 pm

    Excellent explanation…..everyone can understand….hats off Mam…

    Reply
  29. Gayathri V

    February 23, 2017 at 2:22 am

    Padhuskitchen is a life saver. You are an angel in disguise ma'am. I simply followed your instructions for kneading and rolling out chapati. And Hurray!!!! All puffed up. It was soft too for a long time. This is my second time. I served it with bindhi masala (again from your Blog!!! ) and everyone liked it very much. Thank you for your useful tips. Hats off and salute.

    Reply
  30. Unknown

    September 3, 2017 at 3:33 pm

    Gr8 Paddu!
    U r the Best.
    Love it Simply!!!!!

    Reply
  31. Unknown

    February 16, 2018 at 9:19 am

    Very useful tips n neatly presented.

    Reply

Leave a Reply Cancel reply

Your email address will not be published. Required fields are marked *

Recipe Rating


Primary Sidebar

About the Author

Meet Padhu, the Chef, the photographer, recipe developer and web designer behind Padhuskitchen which features Simple Indian Vegetarian recipes, healthy recipes, kids friendly recipes, Indian festival recipes, traditional South Indian Vegetarian ...

Read More

Padhuskitchen Recipes on YouTube

Padhuskitchen Youtube

Let’s Connect

  • Facebook
  • Twitter
  • Instagram
  • YouTube
  • Pinterest
  • RSS Feed

Browse by Cuisines

Kerala Recipes
Punjabi Recipes
Andhra Recipes
Gujarathi Recipes
Maharashtrian
Tamil Brahmin Recipes
Karnataka
International
Indo Chinese Recipes

Browse by Categories


Recent Posts

  • Cabbage Rice-Lunch Box Recipe-Cabbage Pulao Recipe-Muttaikose Sadam
  • Chana Dal Pulao-Bengal Gram Dal Rice
  • Ragi Masala Dosa-Finger Millet Masala Dosa Recipe-Kelvaragu Masala Dosai
  • Girmit Recipe-North Karnataka Style Masala Spicy Puffed Rice Chaat
  • Poha Sweet Snack-Breakfast-Kerala Aval Vilayichathu-Sweetened Rice Flakes

Baby Recipes

Baby Recipes

https://youtu.be/ObMz4uI5zUc

Copyright © 2025 Padhuskitchen