

Green Gram Dal/Moong Dal Recipe
Prep time – under 15 mins
Cook time – under 30 mins
Serves – 2
Ingredients needed
Green gram – 1/2 cup
Tomatoes – 3 medium size
Turmeric powder -1/4 tsp
Chilli powder – 1 tsp flat
Coriander powder – 2 tsp
Cumin powder – 1/2 tsp
Garam masala powder – 1/2 tsp or (kitchen king masala powder )
Salt as needed
For grinding
Onion – 2 medium size
Green chilli – 1-2
Garlic cloves – 4
Ginger – 1 inch piece
For the seasoning
Oil – 2 1/2 tbsp
Cumin/ jeera seeds – 1 tsp
For garnishing
Coriander leaves
Preparation ( keep these 3 things ready)
3.Grind chopped onions, garlic, ginger and green chillies to a fine paste without adding water.

Method


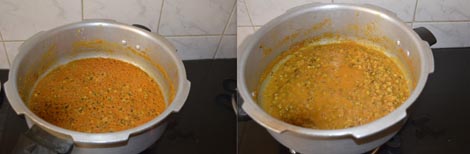
Comforting, filling, delicious, simple and healthy Moong dal gravy is ready to be served with roti, parathas or rice.
Note – You can adjust the consistency of the gravy according to your preferences.
Check out more Dal Recipes
 |
| Indian dinner Ideas – Rotis-Moong Dal-Cucumber /kheera Raita |
Indian Dinner Ideas- Roti – Cucumber raita -Moong dal
If you found this post useful, I would really love it if you pin it or share it with your Facebook fans or Twitter followers or Google+ circles today. All it takes is a simple click on the “pin it” “like,” “share,” “tweet,” or Google+ buttons below the post. It will keep me motivated. Thank you!
Love the dish
I make this often.. healthy recipe.. 🙂
very tempting and mouthwatering recipe….
Healthy dal Paddu! Even I do this dal with slightly different procedure. Loved the 1st pic!
hi padhu i almost tried all your recipes and it came very well . awesome such a fingerliking dish
I love to make all types of legumes and beans in my pressure cooker. However, I've got to assume that Indian and American cookers are different somehow. Mine doesn't whistle…it hisses the steam out continuously. Can you convert your direction of "1 whistle" into a number of minutes for me? I know moong beans don't need much time to cook. BTW, love your recipes! Thanks!
You need to put what we call a weight on the outlet where steam hisses out. When the pressure builds up enough it lifts the weight and the steam whistles out until the pressure inside is the same as outside.
Padhu ji, you explain everything so good. Hats off to you. its sounds and looks very delicious. I will definitely try this. Thank you.
hey padhu….love moong dal and this kind of dal is an all time favourite…love ur blog coz u detailing is so good…
very healthy recipe and also the combination with chapathi and raitha suuuuper, yummyiiiii too. i will try this.
VJ – I do not know about the cookers available in US.Most important thing is moong dal should be cooked soft. That's all.Suppose if you soak moong dal overnight, then you can pressure cook for just 1 whistle. So do not bother about the whistles or hisses, just cook the moong dal until soft but not mushy.
Looks delicious and a healthy and lovely spread for dinner..I usually make it as green gravy and will try this out.
My fav curry recipe but i ll do this with different procedure…Ur's looks interesting padhu…
Super dish perfect with rotis !!
Healthy and delicious curry.
Willl make it today!
This is an awesome way to make Moong dhal! It is usually a pain to make my family eat the dhal-type moong dhal i make, but this went down rather quick! I now use this as the base for any gravy i make for different soaked beans and they all turn out just as well. Thank you so much!
Can the same recipe be tried with green gram sprouts? ? If so for how long should the sprouts be pressure cooked? ? Or can they just be added to the sauté and simmered with water covered till they are cooked? ?
Sid – Yes, it can be tried with moong sprouts. You can just add, saute and cook simmered in water. (your second suggestion)
Made my first attempt…came out really gud… Thnx.. 🙂
Hi padhu..m a beginner in cooking..ur blog s very useful
Padhu ur blog s very useful ..I really donno cooking at al..t s been a yr since m married. ..n nw I became an expert coz f ur blog..thanx luv t
Hi Padhu. I'm an Irish who loves Indian food, and I love using your blog to learn real Indian cooking. Thank you for all the great work you put into it. Can you advise me about grinding the spices please. What is the best equipment to use?
Thank you so much Issi. Glad you found my blog and recipes useful.
In India, we grind it in a mixer grinder. The mixie we get here is suited for Indian cooking. You can use a small coffee grinder. Toast the spices slightly before grinding to bring out its flavor.
Also, do you grind the chillis with the seeds in? Does this make the dal very hot?
Yes. we grind it with the seeds. It does not make the dal hot. It depends on the variety of chilli used.
Just tried this and it was delicious – thank you! (I was a bit lazy, though, and didn't blanch, peel and puree the tomatoes – just chopped them into small pieces.)
Also, if you don't have time to soak the gram for 4 hours and/or don't have a pressure cooker, you can use the "quick soak" method: Put the gram in a pot with hot water and bring to a boil. Boil for 2 minutes and then remove from heat, cover, and let it sit in the same water for an hour or so. Drain and rinse and then cook as usual (it will be almost ready, so it won't take long). 🙂
Tried this out and turned out awesome 🙂 Thanks much.
Thank you for step by step explanation
Curry was super tasty. Thanks for sharing
When I tried this recipe, I found the curry to be little bitter. Can u help me identify the mistake?
There is nothing in this recipe for the curry to turn bitter. One reason would be you might have over fried or burnt the onions. Add more oil if needed to saute the onion paste.
Hi. I too make this gravy often for dinner. A teaspoon of sugar in it adds to the flavour too. One can also add pav bhaji masala instead of garam masala for taste variation….my family prefers the dry moong sprouts bhaji to the gravy.:-)
For dry curry, the sprouts should be pressured cooked with half glass water for 2 whistles and steam should be allowed to cool on it's own (10-15 min depending on the quantity of sprouts)
Thanks Padhu..I follow your blog offen.its a very useful one for me..tried this green gram recipe and turned out well.Thank you
Regards, Rev
This is brilliant! Thank you for the detailed steps. It comes to the rescue of so many daughters in law 🙂
Tried this for the first time for my sis and it came out sooo good & awesome…. tada.. Unlike other websites padhuskitchen gives a clear picture step by step.. Thank you !!
Shall we use sprouts for this instead of green gram
Of course, you can use sprouts.
Superb pathu mam I am a fresher in cooking your blog helps me a lot
Such a simple recipe and a yummy dish, I am a fan of your recipes :D, you rock !!!!
Padhu I tried your recipe yesterday and it turned out perfect!! Thanks!
Thank you, Padhu! As a single dad, your recipes have been a great benefit to cook a variety of delicious meals for my daughter and myself. I tried this today and it came out great! Once again, my heartfelt thanks for your efforts in putting out the recipes and maintaining them on this site.
Can you please let me know whats the reason for blanching tomatoes? Can I instead just grind the tomatoes without putting those tomatoes in hot water and peeling it's skin? What difference does it have?